Difference between revisions of "Floating Beer Pong and Cooler"
Jump to navigation
Jump to search
(Created page with "category:SteakSauce86's projects {{Infobox project |project_name = Cigar Box Guitar |image = CSGFinished2.jpg |caption = The completed guitar |owner = critter42 |version = 1...") |
|||
| (6 intermediate revisions by the same user not shown) | |||
| Line 1: | Line 1: | ||
| − | [[category: | + | [[category:bseishen's projects]] |
{{Infobox project | {{Infobox project | ||
| − | |project_name = | + | |project_name = Floating Beer Pong with Cooler |
| − | |image = | + | |image = 32457_706964799776_6506570_38250780_2564730_n.jpg |
| − | |caption = The completed | + | |caption = The completed Beer Pong Table |
| − | |owner = | + | |owner = bseishen |
|version = 1.0 | |version = 1.0 | ||
| − | |status = | + | |status = Finished |
| − | |start_date = | + | |start_date = Summer 2010 |
|media = | |media = | ||
|flicker = | |flicker = | ||
| Line 15: | Line 15: | ||
|youtube = | |youtube = | ||
|digg = | |digg = | ||
| − | |cost = | + | |cost = ~50.00 |
}} | }} | ||
== Overview == | == Overview == | ||
| − | I wanted a | + | I wanted a well built beer pong table that could take years of abuse on the Tennessee river. |
| − | |||
| − | |||
| − | |||
| − | |||
| − | |||
| − | |||
| − | |||
| − | == | + | == Bill of Materials for the beer pong table == |
| − | |||
| − | + | {{bom-start}} | |
| + | {{bom-row | ||
| + | | item = 4x8 sheet of 3/4 outdoor plywood | ||
| + | | quantity = 1 | ||
| + | | distributor = Lowe's Home Improvement | ||
| + | }} | ||
| + | {{bom-row | ||
| + | | item = ~20 Feet of 4in Sewer Pipe | ||
| + | | quantity = 1 | ||
| + | | distributor = Lowe's Home Improvement | ||
| + | }} | ||
| + | {{bom-row | ||
| + | | item = 4in 90° bend elbows | ||
| + | | quantity = 4 | ||
| + | | distributor = Lowe's Home Improvement | ||
| + | }} | ||
| + | {{bom-row | ||
| + | | item = A Pack of 2ft Zip Ties | ||
| + | | quantity = 1 | ||
| + | | distributor = Lowe's Home Improvement | ||
| + | }} | ||
| + | {{bom-end}} | ||
| − | |||
| − | + | == Bill of Materials for the floating cooler == | |
| − | + | {{bom-start}} | |
| − | |||
| − | |||
| − | |||
| − | |||
| − | |||
| − | |||
| − | |||
| − | |||
| − | |||
| − | |||
| − | |||
| − | |||
| − | |||
| − | |||
| − | |||
| − | |||
| − | |||
| − | |||
| − | |||
| − | |||
| − | |||
| − | |||
| − | |||
| − | |||
| − | |||
| − | |||
| − | |||
| − | |||
| − | |||
| − | |||
| − | |||
| − | |||
| − | |||
| − | |||
| − | |||
| − | |||
| − | |||
| − | |||
| − | |||
| − | |||
| − | |||
| − | |||
| − | |||
| − | |||
| − | |||
| − | |||
| − | |||
| − | |||
| − | |||
| − | |||
| − | |||
| − | |||
| − | |||
| − | |||
| − | |||
| − | |||
| − | |||
| − | |||
| − | |||
| − | |||
| − | |||
| − | |||
| − | |||
| − | |||
| − | |||
| − | |||
| − | |||
| − | |||
| − | |||
| − | |||
| − | |||
| − | |||
| − | |||
| − | |||
| − | |||
{{bom-row | {{bom-row | ||
| − | | item = | + | | item = ~6 Feet of 4in PVC Sewer Pipe |
| − | | | + | | quantity = 1 |
| − | | quantity = | + | | distributor = Lowe's Home Improvement |
| − | | distributor = | + | }} |
| + | {{bom-row | ||
| + | | item = ~4 Feet of 1-1/2 in PVC | ||
| + | | quantity = 1 | ||
| + | | distributor = Lowe's Home Improvement | ||
| + | }} | ||
| + | {{bom-row | ||
| + | | item = 4in pipe caps | ||
| + | | quantity = 4 | ||
| + | | distributor = Lowe's Home Improvement | ||
}} | }} | ||
{{bom-row | {{bom-row | ||
| − | | item = | + | | item = Pack of Ball ended bungee cords |
| − | + | | quantity = 1 | |
| − | | quantity = | ||
| distributor = Lowe's Home Improvement | | distributor = Lowe's Home Improvement | ||
}} | }} | ||
{{bom-row | {{bom-row | ||
| − | | item = | + | | item = Ratchet Strap |
| − | | | + | | quantity = 1 |
| − | + | | distributor = Lowe's Home Improvement | |
| − | | distributor = | ||
}} | }} | ||
{{bom-row | {{bom-row | ||
| − | | item = | + | | item = A Cooler |
| − | | | + | | quantity = 1 |
| − | + | | distributor = Walmart | |
| − | | distributor = | ||
}} | }} | ||
{{bom-end}} | {{bom-end}} | ||
| − | + | == Tools Used for Construction == | |
| − | + | {{tool|3in Hole Saw}} | |
| + | {{tool|Circular Saw}} | ||
| + | {{tool|Straight Edge}} | ||
| + | {{tool|Dikes}} | ||
| + | {{tool|Hack Saw}} | ||
| + | {{tool|drill with 1/2 bit}} | ||
| + | == Construction == | ||
| + | ===Beer Pong Table=== | ||
| + | *The 4x8 sheet of plywood needs to be ripped in half giving the dimensions of 2x8. (8feet is the regulation Beer Pong table size) | ||
| + | *Next strategically mark out drill points on the plywood. On a beer pong table, you want all of the cup rims just to barely touch. To do this, measure the diameter of the cup. The center of each drill point should not be less than this measurement. | ||
| + | *Drill all 20 beer pong cup holes. | ||
| + | *A nice touch is to also drill two extra holes for wash cups. These are used to wash the ping pong balls if they get dirty. | ||
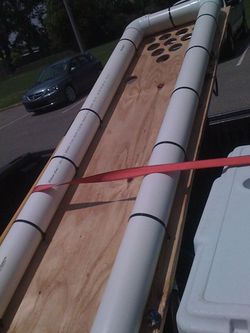
| + | *Next build a pvc pontoon out of the pipe and elbows. Cut the pipe with a hacksaw and glue together. The finished outside dimensions should be 2feet by 8feet. | ||
| + | *Now place the plywood on top of the PVC pontoons. | ||
| + | *Next drill holes on either side of the 4in PVC pipe and run a zip tie through the top of the plywood and around the PVC pipe. Repeat until the top is securely fastened to the PVC. | ||
| + | ===Floating Cooler=== | ||
| − | + | == Pictures == | |
| − | == | + | [[File:32457 706964799776 6506570 38250780 2564730 n.jpg|200px|thumb|none|Beer Pong table and cooler ready for Transport]] |
| − | + | [[File:32457_706506662886_6506570_38236888_3707195_n.jpg|200px|thumb|none|Completed Floating Beer Cooler]] | |
| − | |||
| − | |||
| − | |||
| − | |||
| − | |||
| − | |||
| − | |||
Latest revision as of 18:24, 13 June 2011
| Floating Beer Pong with Cooler | |
|---|---|

The completed Beer Pong Table | |
| Information | |
| Owner | bseishen |
| Version | 1.0 |
| Status | Unknown |
| Started On | Summer 2010 |
| Cost | ~50.00 |
Overview
I wanted a well built beer pong table that could take years of abuse on the Tennessee river.
Bill of Materials for the beer pong table
| Item | Metric | Cost/Item | Qty | Sub Total | Distributor |
|---|---|---|---|---|---|
| 4x8 sheet of 3/4 outdoor plywood | N/A | Unknown | 1 | Unknown | Lowe's Home Improvement |
| ~20 Feet of 4in Sewer Pipe | N/A | Unknown | 1 | Unknown | Lowe's Home Improvement |
| 4in 90° bend elbows | N/A | Unknown | 4 | Unknown | Lowe's Home Improvement |
| A Pack of 2ft Zip Ties | N/A | Unknown | 1 | Unknown | Lowe's Home Improvement |
Bill of Materials for the floating cooler
| Item | Metric | Cost/Item | Qty | Sub Total | Distributor |
|---|---|---|---|---|---|
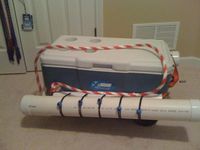
| ~6 Feet of 4in PVC Sewer Pipe | N/A | Unknown | 1 | Unknown | Lowe's Home Improvement |
| ~4 Feet of 1-1/2 in PVC | N/A | Unknown | 1 | Unknown | Lowe's Home Improvement |
| 4in pipe caps | N/A | Unknown | 4 | Unknown | Lowe's Home Improvement |
| Pack of Ball ended bungee cords | N/A | Unknown | 1 | Unknown | Lowe's Home Improvement |
| Ratchet Strap | N/A | Unknown | 1 | Unknown | Lowe's Home Improvement |
| A Cooler | N/A | Unknown | 1 | Unknown | Walmart |
Tools Used for Construction
3in Hole Saw
Circular Saw
Straight Edge
Dikes
Hack Saw
drill with 1/2 bit
Construction
Beer Pong Table
- The 4x8 sheet of plywood needs to be ripped in half giving the dimensions of 2x8. (8feet is the regulation Beer Pong table size)
- Next strategically mark out drill points on the plywood. On a beer pong table, you want all of the cup rims just to barely touch. To do this, measure the diameter of the cup. The center of each drill point should not be less than this measurement.
- Drill all 20 beer pong cup holes.
- A nice touch is to also drill two extra holes for wash cups. These are used to wash the ping pong balls if they get dirty.
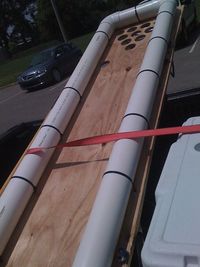
- Next build a pvc pontoon out of the pipe and elbows. Cut the pipe with a hacksaw and glue together. The finished outside dimensions should be 2feet by 8feet.
- Now place the plywood on top of the PVC pontoons.
- Next drill holes on either side of the 4in PVC pipe and run a zip tie through the top of the plywood and around the PVC pipe. Repeat until the top is securely fastened to the PVC.

