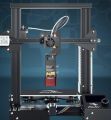
FxTrip's Ender 3
| FxTrip's Ender 3 Print/Laser/EDM | |
|---|---|

| |
| Information | |
| Owner | Fxtrip |
| Version | 1.0 |
| Status | In Progress |
| Started On | February 2025 |
| Cost | TBD |
Overview
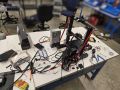
My Ender 3 is a heavily modified original V1 model, upgraded for high-speed, high-quality printing with modular capabilities in mind. It’s equipped with a BIGTREETECH SKR Mini E3 V3.0 mainboard, which offers quiet TMC2209 stepper drivers and Klipper compatibility thanks to its 32-bit architecture. I’ve replaced the stock extruder with a Sprite Pro direct-drive system, enabling better control over flexible filaments and high-temperature materials. The printer is controlled via a Raspberry Pi 4 running Klipper, Moonraker, Mainsail (for the web interface), and KlipperScreen, which outputs to a BIGTREETECH PITFT50 V2.1 5" touchscreen for local access.
My setup is optimized for manual tuning first—focusing on filament flow rate and pressure advance—before implementing accelerometer-based input shaping. The long-term goal is to rival the speed and quality of printers like the Bambu A1 Mini while maintaining full control over the system. I’m also developing a modular quick-change toolhead system that allows me to swap between the 3D print head, a small CNC spindle for aluminum machining, a Rack Robotics EDM head, and a laser engraver. Each toolhead will have dedicated connectors for clean, tool-specific wiring. The frame is stabilized with a foam base and weighted platform to reduce vibration during fast movements, further improving print consistency.
Features
|
🔧 Mechanical & Frame Upgrades ✅ Replaced all motion axes (X, Y, Z) with linear rails for smoother, more precise movement 🛠️ Electronics & Wiring ✅ Replaced stock mainboard with BIGTREETECH SKR Mini E3 V3.0
✅ Completely rewired the board to support modular toolheads with clean routing |
📦 Firmware & Software Stack ✅ Flashed firmware to Klipper for higher precision and faster print speeds
✅ Manual tuning of:
🔜 Plan to add an accelerometer for input shaping and resonance compensation 🧰 Toolhead & Multi-Mod Functionality (Planned) 🔁 Developing a manual quick-change system to swap between:
✅ Designed system with separate cable connectors per toolhead for clean transitions |
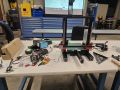
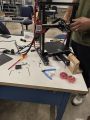
Journal Pictures
-
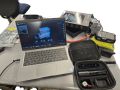
 Starting with a $170 Ender3v1 printer. (I've seen as low as $50 on craigslist). I chose this printer due to its extruded aluminum profile.
 -
 A friend let us borrow their 3D scanner, so I had a slight detour.
 -
 You could read the text on the bottom of it too!
 -
 Replacing the Bowden Extruder with a Direct Drive Sprite Pro. Direct drive allows me to print flexible filament, and the extruder gets to 300C for higher temp filaments.
 -
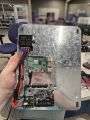
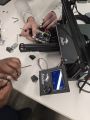 Replacing the stock Ender 3 board with the BIGTREETECH SKR Mini E3 V3.0
 -
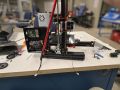
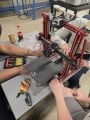
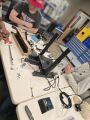 Here we are adding linear rails
 -
 Upgrading Linear Rails
 -
 Added supports for wobble
 -
 Printed a failed case. I didn't check the usb clearance and trusted google.
 -
 Are those sharks with laser beams attached to their heads?
 -
 At this point it was a wise move to get a m3,m4,m5 t-nut, kit and screw kit. Enders use these 3 types and nothing more typically. I will say there were a few times i needed a longer bolt that wasn't included in the kit. Buy 8 spares at an extended length and break them to length with your wire strippers.
 -
 Its always good to have a pinout. There were some spares here that had me worried.
 -
 The fans were odd. It came for a direct wire on the fan which I recrimped and moved to the board.
 -
 Added some covers to keep the junk out of the t slots.... and it looks cool.
 -
 Got a large enclosure. Its nice now but it will be packed in the future.
 -
 Adding Y axis rail. It was pretty annoying to find the right kit here.


Why change to the BIGTREETECH SKR Mini E3 V3.0


Replacement Vs Stock
Replacing the stock Ender 3 board with the BIGTREETECH SKR Mini E3 V3.0 was one of the most impactful improvements to the printer. The stock Creality board is limited by its 8-bit processor, loud stepper drivers, and minimal firmware flexibility. The SKR Mini upgrade addressed all of these issues while maintaining compatibility with the Ender 3’s wiring and form factor.
The V3.0 board uses a 32-bit processor, allowing for smoother motion planning and the ability to run advanced firmware like Klipper. It also includes TMC2209 stepper drivers, which significantly reduce motor noise and allow for features like sensorless homing and dynamic current control.
This board was a drop-in replacement that required no major rewiring. It provided immediate support for upgrades like KlipperScreen, pressure advance tuning, and future modular toolhead swaps. The multiple fan headers, dedicated BLTouch port, and cleaner power delivery made it an ideal foundation for expanding the printer’s capabilities.
Beyond the technical improvements, the SKR Mini brought better thermal safety features, improved voltage regulation, and community-supported firmware options that made the printer far more reliable and customizable.
This upgrade effectively transformed the Ender 3 from a basic budget printer into a flexible, quiet, high-performance machine ready for advanced use cases like CNC, laser, and EDM integration.
Replacing the Stock Screen with a Web Interface Using Klipper
When upgrading an Ender 3 to run Klipper firmware, the stock rotary dial and LCD interface are no longer used. Instead, Klipper offloads the printer's control logic to a more powerful processor—typically a Raspberry Pi or similar single-board computer—connected to the printer via USB. This setup enables remote control and monitoring over your local network using a web interface like Mainsail, Fluidd, or OctoPrint (with Klipper plugin).
Once Klipper is installed and configured, the printer is no longer dependent on the limited interface of the built-in screen. Instead, you can access a full-featured web dashboard from any device on your network—phone, tablet, or PC—by entering the Pi’s IP address or hostname (e.g., http://mainsail.local).
These web interfaces provide real-time control over movement, temperatures, fan speeds, macros, and print progress. They also support live terminal access, file uploads, G-code previewing, and temperature graphs—far beyond what the stock screen offers.
For users who still want local touchscreen control, KlipperScreen can be installed to display a custom interface on an attached screen (like the BIGTREETECH PITFT50), effectively replacing the dial-and-click LCD with a modern touchscreen.
This shift not only improves usability, but also paves the way for advanced features like macro scripting, pressure advance tuning, input shaping, and multiple toolhead control—all managed through a responsive and intuitive web interface.
Why Upgrade to Linear Rails on the Ender 3


Upgrading to linear rails is a major mechanical improvement that replaces the stock V-wheels and aluminum extrusion rollers with precision-machined steel guides and carriage blocks. These rails offer a significant boost in rigidity, accuracy, and long-term reliability—especially important for high-speed printing and modular toolhead setups like CNC, laser, or EDM.
Stock Roller Bearings
The stock Ender 3 rollers are affordable and easy to maintain, but they introduce mechanical play over time, can wear unevenly, and rely on proper tension to perform well. Linear rails eliminate these issues by providing smoother, lower-friction motion with minimal backlash. This translates to more accurate layer placement, better dimensional consistency, and reduced artifacts like ringing or ghosting.
For applications that demand higher acceleration, tighter tolerances, or heavier toolheads, linear rails offer the mechanical stability needed to maintain print quality at speed. They also handle more weight without flex, which is essential when mounting alternative heads like a laser module, EDM head, or compact CNC spindle.
While the installation requires some alignment effort and possible frame shimming, the result is a more professional-grade motion system. Combined with Klipper firmware and input shaping, linear rails unlock the full speed and precision potential of the Ender 3 platform.
Why Upgrade to the Sprite Pro, CHT Nozzle, and Bi-Metal Block with a 60W Heater

Upgrading the stock Ender 3 hotend setup to a Sprite Pro direct drive extruder, paired with a CHT-style high-flow nozzle, bi-metal heat block, and a 60W heater cartridge, is a practical and performance-focused enhancement. While not the absolute highest-flow setup available, this combination offers a strong balance of reliability, speed, and versatility for everyday printing—including flexible materials, high-temp filaments, and moderate-speed high-flow prints.
The Sprite Pro is a compact all-metal direct drive system designed to handle higher-temp filaments and flexible materials with greater precision than a Bowden setup. Direct drive allows more accurate extrusion and retraction control, which is essential when dialing in pressure advance or minimizing stringing in faster prints.
Paired with a CHT nozzle (short for "core heating technology"), this setup enhances melt capacity by splitting the filament path into multiple channels inside the nozzle. This increases the surface area in contact with heat, resulting in a faster and more complete melt—crucial for sustaining higher flow rates.
The addition of a bi-metal heat block improves thermal efficiency by isolating the heater zone from the heat break. Combined with a 60-watt heater cartridge, this enables more consistent thermal performance under load, meaning fewer temperature drops during long or fast extrusion moves.
Flow Rate Comparison and Realistic Expectations
In terms of raw flow, this setup is capable of sustaining 20–25 mm³/s, depending on your filament and temperature. That’s a significant jump from the stock Ender 3 configuration, which maxes out around 10–12 mm³/s with a standard brass 0.4mm nozzle and 40W heater.
By comparison, the Bambu Lab A1 (and A1 Mini) with its proprietary high-flow hotend achieves around 24–30 mm³/s, thanks to its optimized melt zone, drive system, and tight integration. So while the Sprite Pro + CHT setup doesn’t exceed Bambu flow rates, it approaches them—especially with tuning.
Why It’s a Solid Choice
Budget-conscious: This upgrade path is far more affordable than a Revo HF, Rapido HF, or Volcano setup with a completely new toolhead
Modular: Each upgrade (extruder, nozzle, heater) improves a different aspect of the hotend system, allowing incremental improvements
Versatile: Supports flexible filaments, ABS, ASA, PETG, and high-temp materials
Field-tested: Widely supported by the Klipper community and fully compatible with pressure advance, input shaping, and high-speed slicer profiles
While it’s not the highest-flow setup possible (for that you’d need a longer melt zone like a Rapido HF or custom Volcano clone), it’s a smart, balanced upgrade path for users looking to push their Ender 3 into modern performance territory without full hotend replacement or expensive proprietary systems.
Add a CR Touch and stop leveling the bed manually?

The CR Touch is an automatic bed leveling sensor made by Creality. It works similarly to the BLTouch by using a retractable probe to physically touch the bed at multiple points. When integrated with Klipper firmware, the CR Touch enables mesh bed leveling, allowing the printer to compensate for an uneven build surface during printing.
With Klipper, the CR Touch measures the distance between the nozzle and the bed across a configurable grid. These measurements are used to create a bed mesh, which Klipper references during a print to dynamically adjust the nozzle height. This results in a more consistent first layer, even if the bed is slightly warped or tilted.
The probing area, number of points, and spacing can be defined in the printer’s configuration file. The mesh data can be saved and automatically reloaded at the start of each print using Klipper’s built-in commands. Users can also fine-tune the nozzle height using a Z-offset, either manually or through macros.
Using a CR Touch with Klipper eliminates the need for manual leveling with paper and springs. It improves print reliability, especially on larger beds or those with less-than-perfect flatness. It also works well with most common build surfaces like glass, PEI sheets, and flex plates.
Sharks with Laser beams attached to their heads

The laser engraver system is based on the Creality Falcon laser module, which will operate independently of the main 3D printer controller. Instead of running through Klipper, the Falcon will be mounted on the Ender 3 frame but connected to its own control board configured to run GRBL. This separates the laser functionality from the printer’s Klipper environment, allowing the laser to be controlled using software like LaserGRBL or LightBurn.
Laser requires manual changing of wires to a different board
Swapping between the 3D printer and laser systems will require a manual changeover process. This includes physically switching the stepper motor and limit switch wiring between the SKR Mini E3 (used for 3D printing) and the GRBL board (used for laser control). Quick-connect plugs or terminal blocks may be used to simplify this process, but a fully streamlined switching system is still under development.
Dedicated development is ongoing to create a clean, reliable wiring solution that avoids conflicts between the two control boards. The goal is to enable rapid, tool-free changeovers without risking hardware damage or introducing electrical noise between systems.
Safety
Safety is a critical consideration when integrating a laser toolhead into a shared platform. The laser will only be powered and controlled when the GRBL board is connected and active. Care will be taken to physically isolate the laser’s power from the 3D printer’s electronics to avoid accidental activation. Safety glasses will be required during operation, and the workspace will include shielding to block reflections and protect bystanders. Limit switches and emergency stops will be tested independently for both toolheads to ensure system integrity.
- 10 % of a laser reflection will blind you or pets in the room**
EDM Machine Inspiration
Overview
click here for what got me interested
Setup Quick Start
click here for the setup of powercore v1
Bill of Materials
| Item | Cost | Quantity | Sub Total | Distributor |
|---|---|---|---|---|
| Creality Ender 3 | 179.00 | 1 | 179.00 | Amazon |
| Double Z-Axis Rail kit | 64.00 | 1 | 243.00 | Amazon |
| CR Touch | 33.00 | 1 | 276.00 | Amazon |
| Bed Leveling Mounts | 12.00 | 1 | 288.00 | Amazon |
| X Axis Rail Kit | 33.00 | 1 | 321.00 | Amazon |
| Pi 4 kit | 119.00 | 1 | 440.00 | Amazon |
| LCD Screen | 52.00 | 1 | 492.00 | Amazon |
| Laser Kit w Board | 145.00 | 1 | 637.00 | Amazon |
| Sprite Extruder Pro | 109.00 | 1 | 746.00 | Amazon |
| Accelerometers 4 pack | 9.00 | 1 | 755.00 | Amazon |
| Diagonal Supports | 36.00 | 1 | 791.00 | Amazon |
| Big Tree Tech E3 V3 mini | 44.00 | 1 | 835.00 | Amazon |
| Fire Proof Enclosure | 33.00 | 1 | 868.00 | Amazon |
| Buck Converter | 10.00 | 1 | 878.00 | Amazon |
| Dual Z Axis Kit | 24.00 | 1 | 902.00 | Amazon |
| tnut kit | 20.00 | 1 | 922.00 | Amazon |
| m3 m4 m5 bolt kit | 20.00 | 1 | 942.00 | Amazon |
| Y axis Kit | 42.00 | 1 | 984.00 | Amazon |
| Tslot Dust Cover | 20.00 | 1 | 1004.00 | Amazon |
| Enclosure | 59.00 | 1 | 1063.00 | Amazon |
| Exhaust Kit | 26.00 | 1 | 1089.00 | Amazon |
| Laser Bed | 27.00 | 1 | 1116.00 | Amazon |
| Heater Block Kit | 27.00 | 1 | 1143.00 | Amazon |
| CHT Nozzle | 21.00 | 1 | 1165.00 | Amazon |
| PEI magnetic bed and plate | 14.00 | 1 | 1179.00 | Amazon |